
I’ve had a plasti-dipped grill for a few years but end up redoing it every spring as the small rock chips allow water behind the plati-dip which turns to ice in the Utah winters and pushes the plati-dip off. May not be as much of an issue in warmer climates. I plan on going to bed liner after this winter. It’s kind of a PITA process to re-do that often. I also have behind the fake hood vent blacked out with plasti-dip and it has held up better where it doesn’t get the direct impact of road debris but is still getting chalky after roughly 2 years.

-
Welcome to H4O! For a reduced ad experience, please login or register with the forum.
You are using an out of date browser. It may not display this or other websites correctly.
You should upgrade or use an alternative browser.
You should upgrade or use an alternative browser.
What did you do with your H3 recently? NEW
- Thread starter cgalpha08
- Start date

My H3’s previous owner plastidipped the mirrors. It’s been peeling since I got it, so I stripped it off this past weekend. Trying to decide if I like the black or chrome better. I’m thinking the chrome is a bit much since I’ve got so much black going on.


Sent from my iPhone using Tapatalk
Sent from my iPhone using Tapatalk

Lauren
Well-Known Member
- Messages
- 127
- Location
- English in Dubai, UAE
It depends on your idea of survival. Its not an alternative to paint (which when done well would last 10+ years) but if you want an easy do it yourself thing and cheap then this is the way to go.
Paint it, wait to dry, dnt like it? Peel it (not easily but its peelable). It will probably last more than a year.
mmm okai, paint it is then! I'm about 99% sure I'll prefer it black. My H3 is a "gold" colour, and the previous owners stuck chrome on everything, and I mean stuck it... literally super glued the covers on :| .. but when I bought it I already knew that would be turned black because it's just a little too "glitzy/ bling" for my taste so just trying to find the best way to do it.
Lauren
Well-Known Member
- Messages
- 127
- Location
- English in Dubai, UAE
I’ve had a plasti-dipped grill for a few years but end up redoing it every spring as the small rock chips allow water behind the plati-dip which turns to ice in the Utah winters and pushes the plati-dip off. May not be as much of an issue in warmer climates. I plan on going to bed liner after this winter. It’s kind of a PITA process to re-do that often. I also have behind the fake hood vent blacked out with plasti-dip and it has held up better where it doesn’t get the direct impact of road debris but is still getting chalky after roughly 2 years.
I see.. maybe the sand will cause the same effect here..? I don't know, I just want to do it in a way where it will last and I won't have to keep worrying about it. I have other things I need to fix on her first though (manifold sensors, y pipe, axle leak, diff bushes, sway bar needs replacing, starting issue... the list goes on)
Lauren
Well-Known Member
- Messages
- 127
- Location
- English in Dubai, UAE
My H3’s previous owner plastidipped the mirrors. It’s been peeling since I got it, so I stripped it off this past weekend. Trying to decide if I like the black or chrome better. I’m thinking the chrome is a bit much since I’ve got so much black going on.
Sent from my iPhone using Tapatalk
I think keep it all black.. like a stealthy ninja

derian06
Red Rockett
- Messages
- 1,866
- Location
- Madison, AL
Rebuilt a trailer, new rear bumper being made. As a side note does anyone have the wiring schematics for our stock backup camera? I ripped the pins out on accident and don’t know which colors go in which slot.


Last edited:
lsv_palana
Well-Known Member
- Messages
- 383
- Location
- Kamchatka, Russia
Looks good !
Отправлено с моего SM-N950F через Tapatalk
Отправлено с моего SM-N950F через Tapatalk

humvee
Well-Known Member
- Messages
- 507
- Location
- Doha, Qatar
Added another inch of lift by stacking another daystar set courtesy of amrg, old rockstars and 37” AT3s


Sent from my iPhone using Tapatalk
Sent from my iPhone using Tapatalk
lsv_palana
Well-Known Member
- Messages
- 383
- Location
- Kamchatka, Russia
My dear Amirican friends.. I am sorry for off topic but i need your help. i trying to register account on some amarican forums about goose and waterfowl hunting, but something wrong every time - confirmation email did not get to me - maybe because i am not in America... can you help me and register account for me and tell me login and password ? thank you...
Отправлено с моего SM-N950F через Tapatalk
Отправлено с моего SM-N950F через Tapatalk
lsv_palana
Well-Known Member
- Messages
- 383
- Location
- Kamchatka, Russia
thank you.. replied in PM..@ lsv_palana PM sent.
Отправлено с моего SM-N950F через Tapatalk

Ghostbuster
Well-Known Member
- Messages
- 862
- Location
- United States
I’m in the process of performing surgery on the H3.
I’m going to install new lower ball joints, bushings pretty much everywhere, upper control arms, tie rod ends, a cv axle, both axle seals, new hub assemblys, rotors and pads all the way around, and new brake fluid. I think that’s it, until I find something else to replace while I’ve got it torn apart.
I’m also going to re-paint the calipers.
Please wish me luck lol. If you have any tips or tricks, I’m all ears.

Sent from my iPhone using Tapatalk
I’m going to install new lower ball joints, bushings pretty much everywhere, upper control arms, tie rod ends, a cv axle, both axle seals, new hub assemblys, rotors and pads all the way around, and new brake fluid. I think that’s it, until I find something else to replace while I’ve got it torn apart.
I’m also going to re-paint the calipers.
Please wish me luck lol. If you have any tips or tricks, I’m all ears.
Sent from my iPhone using Tapatalk

lsv_palana
Well-Known Member
- Messages
- 383
- Location
- Kamchatka, Russia
Hello dear friends ! I still have problem with knock 2 bank 2.. i replaced sensor, check harness connector to sensor. error still presist. It appears when i enter to water. i think there is some connector that have corroded contacts and water makes error.. who knows where else i can find connector that lead to knock sensor 2 bank 2 ? THANKS !
Отправлено с моего SM-N950F через Tapatalk
Отправлено с моего SM-N950F через Tapatalk

Lsv...
Is this what you're looking for?
https://www.rockauto.com/en/catalog...tor,knock+/+detonation+sensor+connector,13326
Is this what you're looking for?
https://www.rockauto.com/en/catalog...tor,knock+/+detonation+sensor+connector,13326
Last edited:

rascole
Well-Known Member
- Messages
- 2,833
- Location
- Bellflower, CA
Goodluck with the LCA rear bushing. PITA to remove.I’m in the process of performing surgery on the H3.
I’m going to install new lower ball joints, bushings pretty much everywhere, upper control arms, tie rod ends, a cv axle, both axle seals, new hub assemblys, rotors and pads all the way around, and new brake fluid. I think that’s it, until I find something else to replace while I’ve got it torn apart.
I’m also going to re-paint the calipers.
Please wish me luck lol. If you have any tips or tricks, I’m all ears.
Sent from my iPhone using Tapatalk

ConcealedGLOCK
Well-Known Member
- Messages
- 57
- Location
- Utah
Enjoying the new rancho.

What's your fender to center of hub measurements? Front looks a bit higher.
What's your fender to center of hub measurements? Front looks a bit higher.
You're right. It's a little uneven. The front is a hair under 28 inches and the rear is only 27.5 inches. It may be the gear in the back weighing it down or the dreaded rancho sag I've seen people post about, who knows. I was thinking about maybe getting some Schwarttzy extended shackles to even it out.
My real issue is keeping the rear even (left-to-right). Since I bought the truck, one side always seems like it sits uneven. Sometimes the it seems back passenger side is lower, sometimes back driver side is lower. After the lift, it seems like the back passenger is lower most of the time. :huh:
lsv_palana
Well-Known Member
- Messages
- 383
- Location
- Kamchatka, Russia
Thank you, but not that.. I mean where is the place in the car where is located connector from knock sensor 2 bank 2 ? First connector located on sensor... i have checked it twice ! it is good... no rust, contacts ok.. from this connector goes two wires and they hide in big pack of wires. My question is - where in the car i can find the connector to which these two wires from the knock sensor 2 bank 2 go ? I think only an electrician can help me. Or someone who know well electric scheme of hummer h3.... Thank you for reading my crazy writings... sorry for bad english.Lsv...
Is this what you're looking for?
https://www.rockauto.com/en/catalog...tor,knock+/+detonation+sensor+connector,13326
Отправлено с моего SM-N950F через Tapatalk

Thank you, but not that.. I mean where is the place in the car where is located connector from knock sensor 2 bank 2 ? First connector located on sensor... i have checked it twice ! it is good... no rust, contacts ok.. from this connector goes two wires and they hide in big pack of wires. My question is - where in the car i can find the connector to which these two wires from the knock sensor 2 bank 2 go ? I think only an electrician can help me. Or someone who know well electric scheme of hummer h3.... Thank you for reading my crazy writings... sorry for bad english.
Отправлено с моего SM-N950F через Tapatalk
Here's the schematic diagram for the knock sensors. Hope it helps.
Attachments
Last edited:
Ghostbuster
Well-Known Member
- Messages
- 862
- Location
- United States
Did anyone else have a fun lunch break?

Sent from my iPhone using Tapatalk
Sent from my iPhone using Tapatalk

5gn-h3t
Well-Known Member
- Messages
- 616
- Location
- Northeast Pennsyltucky
Haha. I’ve spent a few lunch breaks like that.
rascole
Well-Known Member
- Messages
- 2,833
- Location
- Bellflower, CA
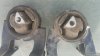
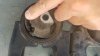
With the help of a great mechanic friend we replaced steering rack, power steering pump, idler pulley, tensioner pulley, both motor mounts ( bad shape), and both CV's. All were not too much of a PITA but it's always easier with a master mechanic. The motor mounts while inplace didn't look bad but a preemptive decision was a wise one. Both were bad, couldn't see the tears until after they were removed. If you have an I5 with over 100k you should consider replacing the motor mounts, vibrations are reduced a lot.


Bowser-II
Well-Known Member
- Messages
- 270
- Location
- Hagerstown, Maryland
Did you use an engine hoist to support the motor when replacing the engine mounts? How did you end up supporting the engine?
Sent from my iPhone using Tapatalk
Yeah that’s a good question, some cars it’s easy to prop the motor up, high clearance 4x4’s maybe not so easy.
Sent from my iPhone using Tapatalk