

I know there are several people with these and a bunch were bought back during that feeding frenzy when they hit EBay. Seeing the "lost treasure" wheels have been found again I thought we should have some info in here.
I thought it would be good to consolidate what we know. So if you mounted or disassembled your own and have any input stick it in here.
I will share what I have learned.
Specifications: 16 x 7.5"
1.5" Offset
5.84" Backspace
6 on 5.5 Lug Pattern
3.938 Hub Bore
2,050 lbs @ 65 psi Load Rating
DOT Compliant
I was weighing up what I have added to the H3, again and weighed a Hutchinson beadlock rim.
They weigh 42 lbs compared to an OEM aluminum wheel at 20 pounds. Geeze heavy Hummer again. Well in areas of weak gravity I should be ok!
I got mine with Cooper STT 35's already installed. Then four more with tires that came from the Detroit Proving Grounds that I did not care for as they were not siped at all.
I installed my steering shaft mod I had on the the 06 H3 to the Alpha with this change. I plan to watch closely for excessive wear or damage. I am also running the BP tie rods with these on the Alpha.
I rebalanced mine after running them for a week or so and they did not require near as much weight as was originally on them. They are smoooth now for a mud tire.
My first set had one with a broken valve stem. I learned that can be unbolted from the outside. They thread into a channel that goes inside the rim. I used the one off a tire that was flat because of a leaky O'ring. I put teflon tape on it and screwed it in.
I broke down the leaky one and found about 3 inches of the O'ring was smashed flat where it got pinched when it got out of the groove during assembly by someone else.
I used a wire wheel on a drill to clean the oxidation off the studs.
I used anti-seize on the bolts on the one I broke down and put back together. They were already corroded and tight. There was lots of red Texas mud on the ones I got!
The guy I ordered the O'rings from said Hutchinson recommended to use Vasoline to condition them and hold them in place upon reassembly.
I went for 80 pounds of torque because of the size bolt. It also shows the tire size as 285. Is anybody running that size on theirs?
I found from two sources Rock Monster Wheels carries parts. The site takes you to a list of dealers.
http://www.rockmonsterwheels.com/buyit.htm
I chose the one in Oklahoma since it is close. They said they deal directly with Hutchinson and will have the O'rings and valve stems drop shipped to me by Wednesday.
Their price was $12.07 on the O'rings and
$2.88 on the valve stems.
I'm cleaning the rim surfaces up with laquer thinner to get the excess rubber from the bead off and getting the oring groove and mating surface clean.
I took the one apart that was flat but had to get a friend with a machine that had that side mount hydraulic arm shaped in a semicircle to pop it off. I only removed the ring side.
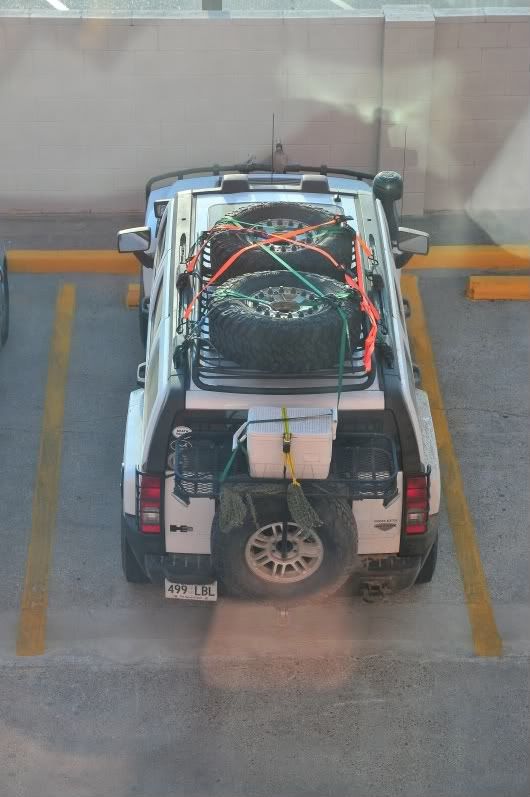
Hauling 5 extra tires and wheels was fun.


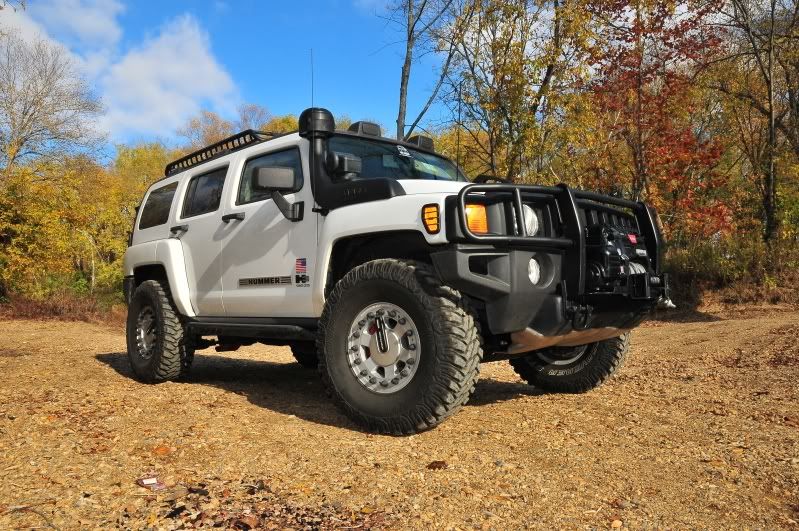



Looks like a little sway bar rubbing at full lock. I try to avoid that on trails anyway and would rather make another point turn than accelerate with them turned that much. The Bridgestones had polished the sway bar but I could not feel that. I can feel these rubbing when those lugs contact the sway bar. Good early warning system! Edit since that time I have found a sweet spot for the torsions that the tires do not rub now.

Like most any multiple mount bolts I planned to stagger the pattern tightening in stages, like I would an engine head or wheel nuts. In this case before I went all over looking for the ft.lbs. or any special sequence, I asked a "reputable source":winkie: and got an answer that sounds right to me.
"Torque specs are 50 in a star pattern, then 80-100 in a circumference pattern(second pass)"
or two whirrr whirrrs set on about 5 and finish up with a torque wrench set to desired level, and pull 1 grunt and a click/click.:d
I thought it was a nice touch to have the wheel number stamped in the wheel as well as the reminder to deflate them BEFORE removing the nuts!
Mine say WO-0615 and two have a C after that
I guess what is the manufacture date is above the serial number D22B07 on four and one is D07A07
I do not have a sequencial set
38,75,76,80,93
Let's see who has the lowest and highest numbers!
Mine don't have the sensors and I probably won't mess with that. I can only imagine what happens if they come loose in there. I started driving (legally) around 1965 and never drove around without air in my tires!
My other four showed up after making it thru a snow storm up in Chicago. I decided to have them shipped. The BFG Mud Terrain T/A were mounted white letters out and I only got four. I sold those 285 tires tires and planned to get a set of something more like an extreme AT for street and desert red rock. My Bridgestone 285's are still mounted on OEM rims so I will run those this summer.
They have 35,000 miles on them and still look good.
So I broke these down on both sides. That was the first time I had seen the inside of the rim. I have only removed the ring to replace an o-ring on the ones I got from Auggie.
These were still shiny and the tires had smooth rubber on them. The story is they were on a Hummer used at a car show in Detroit and it was trailered to and from the location. Then were stored in Detroit at the proving grounds.
You got to have a good story to make it more interesting. So now I am looking for pictures that might show what Hummer they were on.
It is interesting to me the random serial numbers on my first ones and these on one vehicle. I guess they shuffle them up.
W0-0615C D26K07
This second set is 192, 206, 184, 207
I guess I need one more wheel.
My first set
Mine say WO-0615 and two have a C after that
I guess what is the manufacture date is above the serial number D22B07 on four and one is D07A07
I do not have a sequencial set
38,75,76,80,93
I'm wondering now how many were made and what numbers will show up in that stash wherever they are.

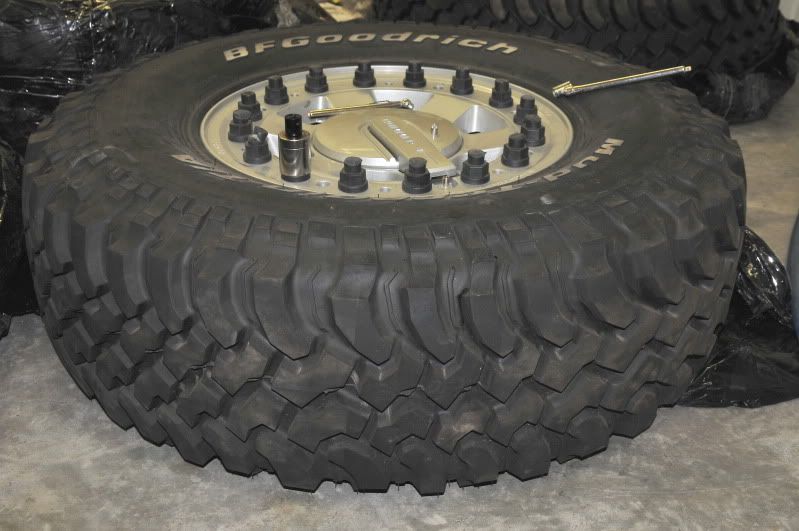
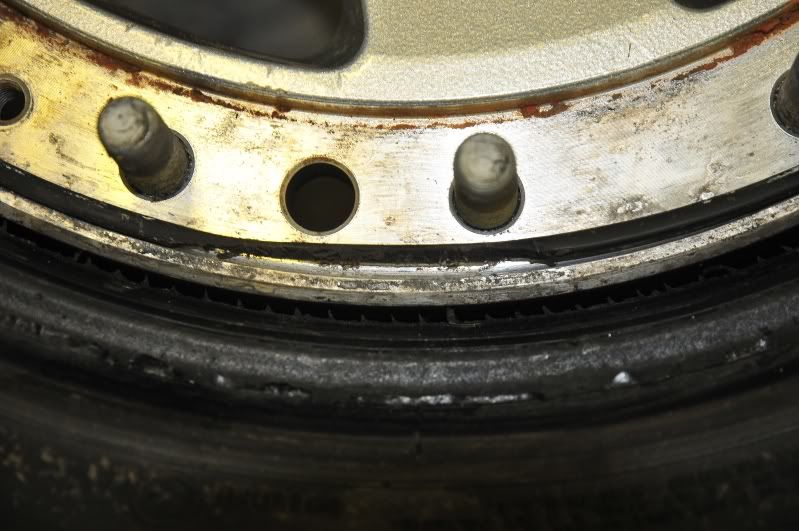
Here is some more first hand info on the wheels. I have not seen any other posts of pictures of the insides.
I, with some help, dissected the last four I got. Whew it took some time and we had to come up with a way to hold the rings while we did it. We used a break down tire machine in two steps to help with part of it but had to use some muscle and wood blocks. There may be a better way but we figured out a way by the third one.
So this answers some of my unanswered questions. The TPM is attached to a bracket that is held by a rivet. I don't know and no one has said what part failed. The TPM is attached to the bracket that is riveted on by a nut on the stem. I can see that lock-tite could be put on that but if the rivet fails it's coming off.
The rivet just goes thru the rubber beadlock insert ring. I can see two places there is a groove on the inside of that piece that goes across the full width. Then there is a hole in the center of that with a brass insert. That groove was aligned with the hole coming from the valve stem mounted in the outer part of the wheel which has a pipe thread mounted in a tapped hole to air up the tire.


This is the inside of the beadlock and backside of the rivet. I can see corrosion and it should have had a washer. I believe if I was going to try using these I would use a SS rivet and washer. Then protect it with some anti-seize to keep the dissimilar metals from causing corrosion. Apparently in that hole it is mounted in the powder coat is not covering the aluminum. That works on sailboats especially in salt water. The aluminum spars often have SS fittings mounted and the rivets corrode if SS is used and not coated. Oxidation must be occurring from a combination of temperature changes and using compressed air with high humidty. This can also be caused by using portable compressors that heat the air to really hot temperatures. That allows moisture to condensate. Just my latest findings, hope it helps.

I thought it would be good to consolidate what we know. So if you mounted or disassembled your own and have any input stick it in here.
I will share what I have learned.
Specifications: 16 x 7.5"
1.5" Offset
5.84" Backspace
6 on 5.5 Lug Pattern
3.938 Hub Bore
2,050 lbs @ 65 psi Load Rating
DOT Compliant
I was weighing up what I have added to the H3, again and weighed a Hutchinson beadlock rim.
They weigh 42 lbs compared to an OEM aluminum wheel at 20 pounds. Geeze heavy Hummer again. Well in areas of weak gravity I should be ok!
I got mine with Cooper STT 35's already installed. Then four more with tires that came from the Detroit Proving Grounds that I did not care for as they were not siped at all.
I installed my steering shaft mod I had on the the 06 H3 to the Alpha with this change. I plan to watch closely for excessive wear or damage. I am also running the BP tie rods with these on the Alpha.
I rebalanced mine after running them for a week or so and they did not require near as much weight as was originally on them. They are smoooth now for a mud tire.
My first set had one with a broken valve stem. I learned that can be unbolted from the outside. They thread into a channel that goes inside the rim. I used the one off a tire that was flat because of a leaky O'ring. I put teflon tape on it and screwed it in.
I broke down the leaky one and found about 3 inches of the O'ring was smashed flat where it got pinched when it got out of the groove during assembly by someone else.
I used a wire wheel on a drill to clean the oxidation off the studs.
I used anti-seize on the bolts on the one I broke down and put back together. They were already corroded and tight. There was lots of red Texas mud on the ones I got!
The guy I ordered the O'rings from said Hutchinson recommended to use Vasoline to condition them and hold them in place upon reassembly.
I went for 80 pounds of torque because of the size bolt. It also shows the tire size as 285. Is anybody running that size on theirs?
I found from two sources Rock Monster Wheels carries parts. The site takes you to a list of dealers.
http://www.rockmonsterwheels.com/buyit.htm
I chose the one in Oklahoma since it is close. They said they deal directly with Hutchinson and will have the O'rings and valve stems drop shipped to me by Wednesday.
Their price was $12.07 on the O'rings and
$2.88 on the valve stems.
I'm cleaning the rim surfaces up with laquer thinner to get the excess rubber from the bead off and getting the oring groove and mating surface clean.
I took the one apart that was flat but had to get a friend with a machine that had that side mount hydraulic arm shaped in a semicircle to pop it off. I only removed the ring side.
Hauling 5 extra tires and wheels was fun.
Looks like a little sway bar rubbing at full lock. I try to avoid that on trails anyway and would rather make another point turn than accelerate with them turned that much. The Bridgestones had polished the sway bar but I could not feel that. I can feel these rubbing when those lugs contact the sway bar. Good early warning system! Edit since that time I have found a sweet spot for the torsions that the tires do not rub now.
Like most any multiple mount bolts I planned to stagger the pattern tightening in stages, like I would an engine head or wheel nuts. In this case before I went all over looking for the ft.lbs. or any special sequence, I asked a "reputable source":winkie: and got an answer that sounds right to me.
"Torque specs are 50 in a star pattern, then 80-100 in a circumference pattern(second pass)"
or two whirrr whirrrs set on about 5 and finish up with a torque wrench set to desired level, and pull 1 grunt and a click/click.:d
I thought it was a nice touch to have the wheel number stamped in the wheel as well as the reminder to deflate them BEFORE removing the nuts!
Mine say WO-0615 and two have a C after that
I guess what is the manufacture date is above the serial number D22B07 on four and one is D07A07
I do not have a sequencial set
38,75,76,80,93
Let's see who has the lowest and highest numbers!
Mine don't have the sensors and I probably won't mess with that. I can only imagine what happens if they come loose in there. I started driving (legally) around 1965 and never drove around without air in my tires!
My other four showed up after making it thru a snow storm up in Chicago. I decided to have them shipped. The BFG Mud Terrain T/A were mounted white letters out and I only got four. I sold those 285 tires tires and planned to get a set of something more like an extreme AT for street and desert red rock. My Bridgestone 285's are still mounted on OEM rims so I will run those this summer.
They have 35,000 miles on them and still look good.
So I broke these down on both sides. That was the first time I had seen the inside of the rim. I have only removed the ring to replace an o-ring on the ones I got from Auggie.
These were still shiny and the tires had smooth rubber on them. The story is they were on a Hummer used at a car show in Detroit and it was trailered to and from the location. Then were stored in Detroit at the proving grounds.
You got to have a good story to make it more interesting. So now I am looking for pictures that might show what Hummer they were on.
It is interesting to me the random serial numbers on my first ones and these on one vehicle. I guess they shuffle them up.
W0-0615C D26K07
This second set is 192, 206, 184, 207
I guess I need one more wheel.
My first set
Mine say WO-0615 and two have a C after that
I guess what is the manufacture date is above the serial number D22B07 on four and one is D07A07
I do not have a sequencial set
38,75,76,80,93
I'm wondering now how many were made and what numbers will show up in that stash wherever they are.
Here is some more first hand info on the wheels. I have not seen any other posts of pictures of the insides.
I, with some help, dissected the last four I got. Whew it took some time and we had to come up with a way to hold the rings while we did it. We used a break down tire machine in two steps to help with part of it but had to use some muscle and wood blocks. There may be a better way but we figured out a way by the third one.
So this answers some of my unanswered questions. The TPM is attached to a bracket that is held by a rivet. I don't know and no one has said what part failed. The TPM is attached to the bracket that is riveted on by a nut on the stem. I can see that lock-tite could be put on that but if the rivet fails it's coming off.
The rivet just goes thru the rubber beadlock insert ring. I can see two places there is a groove on the inside of that piece that goes across the full width. Then there is a hole in the center of that with a brass insert. That groove was aligned with the hole coming from the valve stem mounted in the outer part of the wheel which has a pipe thread mounted in a tapped hole to air up the tire.
This is the inside of the beadlock and backside of the rivet. I can see corrosion and it should have had a washer. I believe if I was going to try using these I would use a SS rivet and washer. Then protect it with some anti-seize to keep the dissimilar metals from causing corrosion. Apparently in that hole it is mounted in the powder coat is not covering the aluminum. That works on sailboats especially in salt water. The aluminum spars often have SS fittings mounted and the rivets corrode if SS is used and not coated. Oxidation must be occurring from a combination of temperature changes and using compressed air with high humidty. This can also be caused by using portable compressors that heat the air to really hot temperatures. That allows moisture to condensate. Just my latest findings, hope it helps.
Last edited: